Lost Wax Casting - Continued
By Mike on Monday, October 26, 2009, 00:24 - Permalink
 On the previous page, I prepared my lost wax mould for casting pewter - so now it's casting time!
I wrapped the mould again in duct tape, in case the heat of casting makes it burst. I also set it in a box of sand to contain any spillages and support it while I pour.
To prevent sand getting into the mould while setting up, I covered the top with plastic film - this will just burn away when I pour the metal.
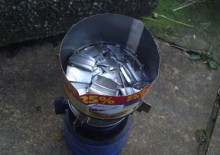
I put the can of pewter pieces on a gas camping stove on full heat
Before very long, the metal began to melt. When it was fully liquid, I picked it up with a long plumber's wrench and poured it into the waiting mould.
It poured quite cleanly, but then began to bubble quite fiercely for a while before settling down.
I left it to cool for half an hour, then removed the tape covering.
The mould was still intact and felt very heavy, hopefully indicating a successful fill.
I started to crack open the mould by tapping gently with a small hammer.
Pieces of the casting started to show - looking good so far.
The mould crumbled away quite easily, leaving one quite solid casting.
An initial inspection revealed one quite large void - a bit of a shame, but otherwise, the casting is in one piece, and is approximately the right shape.
I scrubbed away the last few bits of clay, then cut off the sprue with a small hacksaw.
There were also a few little tags and blobs where there must have been bubbles or imperfections in the layer of clay immediately covering the wax - I cut these off with wire cutters.
I gently filed away any remaining sharp or protruding bits, and it was finished.
So here it is - it's not perfect, nor is it elegant, but it's almost exactly what I was aiming for, so I'm quite happy with it.
Lessons Learned
This was my first attempt at lost wax casting and as usual, I approached it without any particularly deep research on techniques and materials. It worked out pretty well, but there are some things I'll do differently next time.
Mould Material
I think the air-drying modelling clay I'm using is a mixture of mineral clay and some kind of glue - probably PVA. I don't think it dries completely enough to be used for this purpose - under the heat of the molten metal, it emits steam, which might create flaws or porosity in the finished cast piece.
Next time, I think I'll use ordinary potters clay.
Voids
The finished piece ended up with quite a large hole in it - caused either by trapped air during pouring, or escaping gases from the clay material
It's a shame this happened, but it's not enough of a problem to make me want to scrap and recast the piece - I was aiming for a primitive look anyway, so this isn't completely out of place.
'Tiny Shiny Horse' was almost immediately named and seized by my daughter - so now I have to make something else for my son - detailed on the next page...
